_edited.jpg)
.jpeg)
.jpeg)

.jpeg)
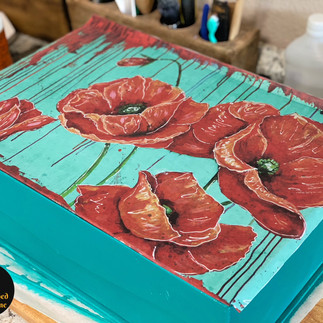
"Poppies, It's Poppies"
- Jenna

- Aug 25, 2021
- 3 min read

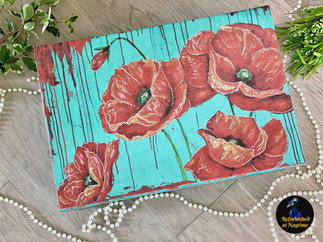
Have you checked out all the new designs from Grace on Design's Summer release of Decoupage papers? Their release was amazing and the details on their decoupage paper are so crisp and clear. I knew I immediately wanted to use the new Poppy themed paper, "Hope". I just love this drippy effect on the paper. Did you know HP-Distribution LLC uses a real artist to design some of their beautiful papers? This was originally a canvas that was printed on paper form.

For this project I found an old cardboard storage box in my daughter's closet that I knew would look beautiful and needed a revamping. Some of the original paper was peeling up and splitting so I figured why not?? You can of course use any project you want for it. Because I was applying the decoupage paper on something that already had paper on it I decided to use the Spray Adhesive method. I didn't want to apply using the clear coat method as too much liquid may have made the original paper bubble and peel up. Using a spray adhesive allows enough sticky residue to be applied without creating a thick layer underneath the paper and allows me to not have to remove the original paper underneath. I was afraid this would alter the quality of the cardboard below that.
**This Post includes affiliate links. Any orders placed through this link are greatly appreciated. They do not cost you any more however I do make a small commission which allows me to continue to bring you more How To's and Videos**
For this project you will need the following supplies:
Eye Love Hue Paint in Bohemian Jewel, French Kiss, and Dusty Desert Pink
Step 1:

I started by painting the outside of the entire box in Eye Love Hue's Bohemian Jewel. The color matched perfectly with the background of the paper. When applying decoupage paper it's helpful to be able to find a coordinating color. This will allow the paper to blend seamlessly. If the color is much darker it may show through the paper.

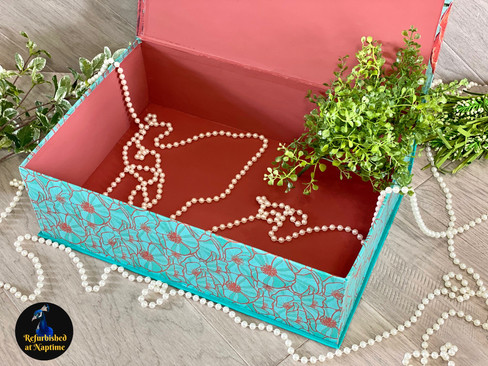
Once the outside was painted in 2 coats and dry I then did a custom mix of Dusty Desert Pink and French Kiss from the Renewed Spirit Line from Eye Love Hue for the inside.
Step 2:

Once your paint has fully dried you are ready to apply the decoupage paper. The smallest page (the main image of the poppies) fit perfectly on the top of the box. I simply needed to fold over the sides. I grabbed my Gorilla Glue Spray Adhesive, picked off any left over residue on the spray nozzle and shook the bottle. Spraying an even coat over the entire top of the box I was quickly able to apply the adhesive. This does make a little bit of a mess so you'll see in this How To Tutorial Video of how I used an old small canvas to help block some of the spray from getting out. I applied the decoupage paper from bottom to top and then used a Brayer to insure the entire paper was flat, smooth and there were no bubbles. You can also use the felt wallpaper applicator to get a smooth finish by running it across the entire paper and lightly pressing it out. I continued to do the same process with the companion paper on the sides and lift top portion of the box. I left a little excess on the sides to fold over the lip of the box. Rather than spraying inside the box I just applied a small portion of clear
coat to those areas so that the excess would stick without making any mess in the box.


Step 3:
I clear coated the inside of the box to protect the paint. You can clear coat your entire piece if you wish however for this one I didn't. I just protected the interior paint as it would be that portion to get the most wear. Now the box is done! So simple!


Comments