_edited.jpg)
.jpeg)
.jpeg)

.jpeg)
Let's Go "Global"... A Step by Step of Designing a Globe
- Jenna

- May 4, 2021
- 6 min read
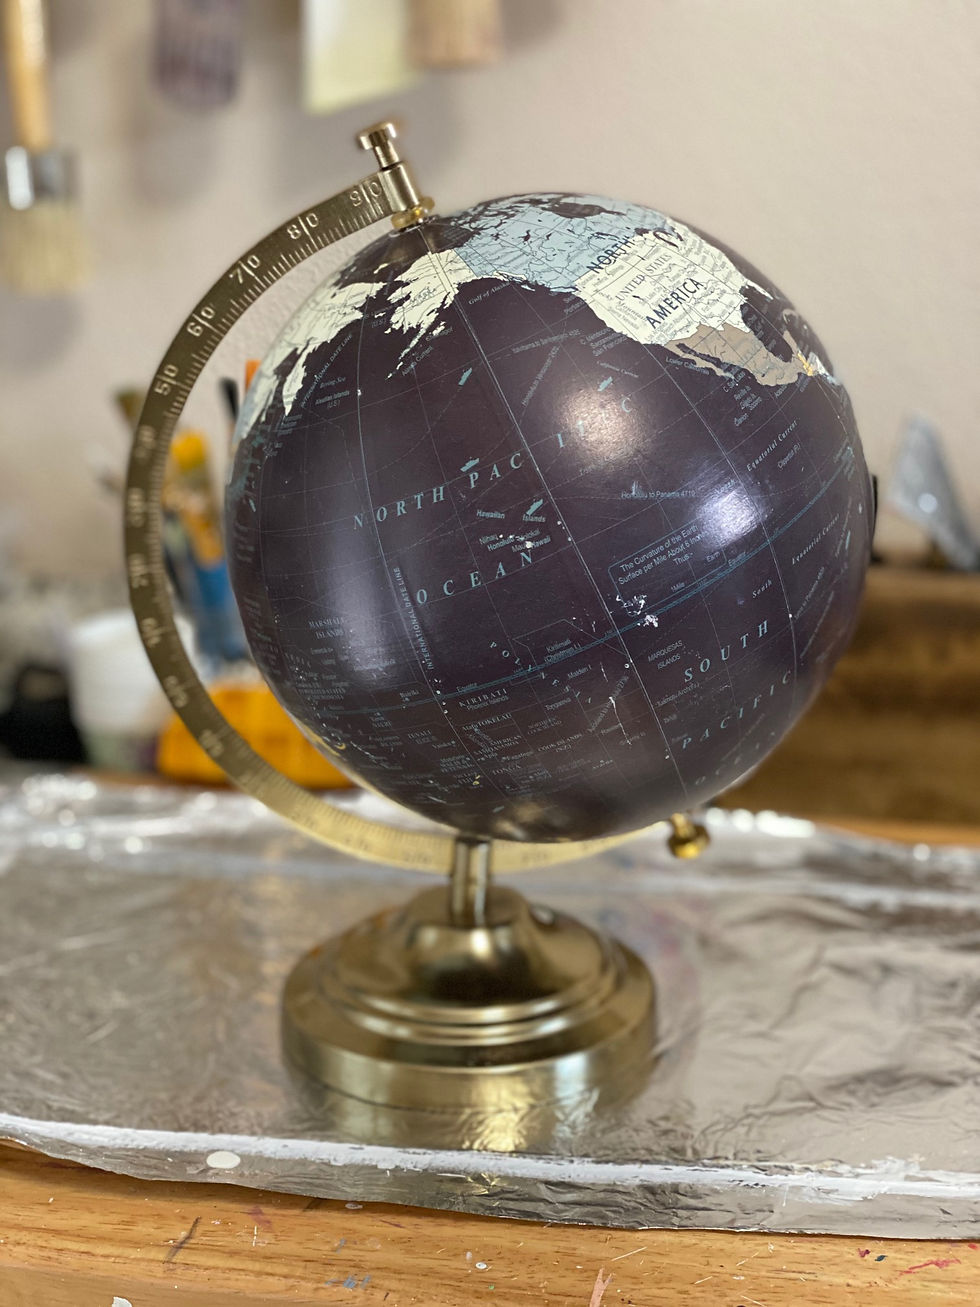
One day I was walking around a thrift store as I often do and came across this $5.00 globe. Not one of the large globes we use to have in school...side note: Do they even still have globes in school?? Anyways, it was a decorative globe that wasn't very pretty and kind of outdated. I thought, I could do something with this. Well a year later I finally did! Seriously, it sat in my staging storage tub for a year. I finally grabbed it out and thought "I think I can make you prettier". Then BOOM! She became a huge social media hit! Isn't she gorgeous??

I immediately received 2 custom orders from some sweet ladies, each with their own designs in mind. Now I can't get enough of them. I have a few in stock just waiting for me to make them pretty *Hint Hint*---custom Orders.

After completing the first order I kept getting questions asking how I did it. Therefore, I thought I would do a full step by step of how I completed my globe. This post does include affiliate links that allow me to continue to bring you great ideas and tutorials and does not cost you anything more. Anything I earn from them is greatly appreciated. So Let's Get Started!
You Will Need:
Any thrift store globe...preferably on a stand
any Chalk Paint though I do prefer Eye Love Hue Paint as it's acrylic based, doesn't require much (if any) sanding and self levels
Spray Paint for your base in the color of your choice. I prefer to keep it neutral so either White, Bronze or Gold.
A Medium Size Artist Brush or The Wooster 2 in Brush if you prefer something larger
the transfer of your choice (for this project I used Floral Collection by Re-Design with Prima)
a clear coat to seal your transfer (Again, I prefer Eye Love Hue's Mystic Shell as it's very durable)
Parchment Paper (I love to paint on it as it doesn't absorb and is easy to wipe off. I've also found my transfers don't stick to it)
Powder Free Gloves (I use gloves when working with light colors so I don't get dirt, ink or grime in my paint when smoothing my transfers)
Step 1:
Start by disassembling your Globe. Let me tell you, this is not always an easy task. Sometimes it's as simple as removing the top and bottom and pulling out the bar. Other times it's having to unscrew them in opposite directions at the same time using the same strength on both. It can be a real pain in the... So! If you can't get your globe apart don't fret! It's not a huge deal.
Step 2:
Decide if you want to keep your paper on or not. I've had some globes where the paper is just chipping away. I've had others where the paper was not going to come off. On this particular globe I did remove the paper as it's fairly simple by just peeling it up and off. If the paper is already peeling on your globe I definitely recommend removing it as it's not worth trying to repair it. If your paper is not going to come off you can use a little wood filler to make the lines less noticeable and then lightly sand over the filler.
Step 3:
Spray paint your base. If your globe is still attached it's okay to get spray paint on it. Honestly, I've found that the spray paint helps to give the ball a little more "texture" which helps your paint adhere a bit better than having a smooth surface. With that being said I certainly wouldn't aim the spray paint for the ball but you don't have to stress about getting some on it.
Step 4:
Once your spray paint has dried ( I recommend 24 hours just because you will be handling it to do your painting and you don't want fingerprints built into the spray paint) you can begin painting! Here comes the fun part of playing Twister with your hands! Thumb and forefinger on top, pinky on ball. Just Kidding! But it does take some practice.

For this particular custom order my client wanted a soft cream. Using Eye Love Hue's Missing Hue and Ho Hum I mixed an equal amount of both to create a very light cream color I like to call Lace. I then got started on painting. I paint upside down when painting on a globe. Meaning, I hold my globe upside down starting at the base and working towards the top. This makes it easier to paint so that I only have to hold the smaller portion (the top ball screw) for the least amount of time as the globe will be able to sit on the stand when painting the top. This is where figuring out your finger placement is key. You'll just need to practice it for a bit.


<<<First Coat
Second Coat>>>
Step 5:
After your paint has fully dried (at least 24 hours) then you can start applying your transfer.

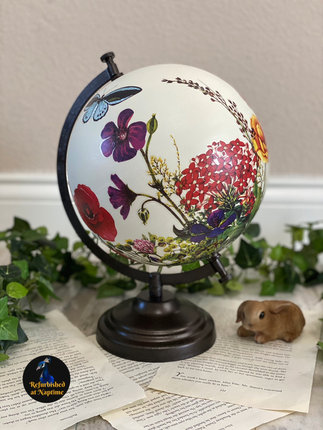
Again, for this globe I used Re-Design with Prima's Floral Collection per my client's request. She saw this design on a jewelry box I had completed and wanted something very similar. We were going for a garden theme so I knew I wanted to apply the flowers heavily and this is a great transfer for that.
I put on my Powder Free Gloves since I don't want to get ink, oil, or grime in my halos around my transfers as I am smoothing them down. Our hands have a lot of oils and I've learned the transfer ink tends to slowly bleed into my fingers after time. By wearing gloves this keep the oil off my work and I don't have to spend time sanding or painting around my transfers later.
After cutting out the first few flowers I wanted I then start to apply the transfer. Laying the globe on it's side over parchment paper (wonderful for not having your design stick or transfer to your surface) helps to keep it from turning or moving around as you work. Start your design at the base of the globe for a fuller greenery look when using flowers. If using a different design feel free to apply how you wish. I prefer to start at the bottom so I know my design is reaching the underside since most globes will either be on a table or shelf and you will definitely see the underside of it.
How do you apply a transfer to a curved surface you ask?? Well do I have the answer for you. Better yet, I have a video of how I applied one of the flowers on this globe. You can catch it Here on my YouTube Channel of how it was done.

My best tip I can give you when applying a transfer over any curved or sharp edge is to cut your transfer. Cut it?? Yes, you heard me right! Don't be afraid to cut around your design. That clear paper is not the most flexible substance to work with and cutting small slits into it won't hurt it! It actually allows the paper to move more freely and overlap which then allows you to manipulate it more and be able to place the design where you want it go versus where it wants to go. I've used this method multiple times and it never fails! You can see in the picture to the left that the clear piece overlapped in some areas (over the red flower) perfectly so that my design when right where I needed it.

Look at that! A perfectly straight flower, no visible halo, no bubbles, and exactly where I wanted it to go!
At this point you are good to go where the design gods take you! Add as much or as little as you wish. It's your design! Your work of art! Make it what you want!
Step 6:
When you have completed laying down your transfer be sure to clear coat the entire globe to seal your transfer. All transfers must be sealed or they will eventually curl up and peel off. You definitely don't want that! I used Eye Love Hue's Mystic Shell Clear Coat in Satin as a little goes a long way and it's very durable! Once that's dried you are finished! Congratulations! You completed your very own one of a kind Home Decor Globe!


I hope this tutorial was helpful! You can find Refurbished at Naptime on Facebook, Instagram, Pinterest and YouTube. Please subscribe to get updates of new blog posts. You can also subscribe to my YouTube channel to receive updates of new videos.


Thank you for sharing!
Wonderful tutorial! Easily explained and easy to follow. Resources for the products used are shown! Great project!
A very well put together tutorial! I love that you have linked all products so we can find them if we choose. Also, I noticed something different in your photo......no book pages! :)