_edited.jpg)
.jpeg)
.jpeg)

.jpeg)
Above the Sea...the Siren Sings her song
- Jenna

- Jun 30, 2021
- 5 min read

Each month HP Distribution teams up with a Paint line to show off some really spectacular collaborations using products from both companies. This month the collaboration was
with Miss Lillian's No Wax Chalk Paint. I was grateful to be given the chance to use some of their beautiful metallic paints; something I've been dying to try for awhile now. I also wanted to give their Sparkle Glitter a try as an additive to their clear coats for that extra bit of bling on the metallics. Check out the beautiful jewelry box I refinished using all of these products along with Grace on Design's Siren's Song Decoupage Paper.
**This post does include affiliate links. Any purchases made through those is appreciated as it allows me to bring you more tutorials and how to videos/blog and it does not cost you anymore.**

Products I used to create this look:
Miss Lillian's No Wax Chalk Paint Metallics in Diva, Shimmering Aqua, Grape Expectations
Miss Lillian's No Wax Luster in Satin
Miss Lillian's Sparkle Glitter in Goldenrod
Grace on Design's Siren's Song Decoupage Pack ( I used both the smallest main image design as well as the companion paper of scales)
Step 1:

I always start a jewelry box by disassembling it. I remove the old lining as it's typically not in the best of shape. Plus, who doesn't love having fresh new lining when purchasing a box? The old hinges and knobs are also removed. Typically, if they are still in good working condition they will just be cleaned up and reused. Removing the lining of a jewelry box is time consuming and a lot work but it's definitely worth it. I won't be going into how I remove it in this blog post but you will get a sneak peek of what I used to reline it further down...something I've never shared. :-)
Step 2:

When using metallics it's often recommended to use a similar shade to the metallic you plan to paint with. However for this project I only had the metallics. Therefore, I didn't apply a coat of primer or slick stick over the wood. I didn't want a white undercoat under the metallic paints. I really wanted to keep the darker shade so my paints wouldn't require as many coats for coverage by having to cover a really bright white.
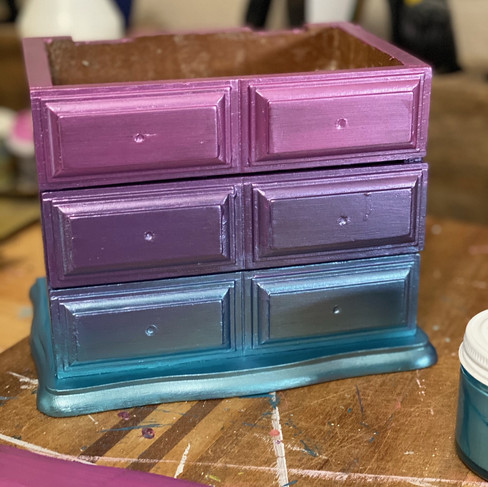
I started by first painting individually each shade one on top of the other in a 3 color layer using my Artist Brush. Here you can see just 2 coats of the metallics and how well they covered. I didn't blend any of the colors together yet so I would have a great base coat of each color down. For this portion I did remove the drawers and paint them individually.

Step 3:
I allowed these to sit overnight so I wouldn't have any peel back as I started to really blend the paints. After they were fully dry I started blending. Typically when I blend I use spray mister to allow the paint to move freely and blend together easily however with Miss Lillian's Metallics I didn't feel that was necessary at all! I simply applied enough paint and worked in sections at a time.
I started on the front putting the drawers back in and starting at the bottom as it was the darkest color: Shimmering Aqua. Doing a good layer of paint I then went up into the already painted purple. I then did a decent layer of purple, Grape Expectations, and bringing it down into the Shimmering Aqua. Blending takes time to get the two colors to mix and "blend" to how you want them to look. I like a smooth blend so it takes me a bit longer. Once I felt I had the bottom two colors blended nicely I worked on blending Grape Expectations and Diva, the pink, together following the same concept. A layer or purple (lighter this time due to already having some of the blue in it) and blending up into the pink while bringing a layer of pink down into the purple. It will takes some practice and it's always up to the artist's eye how they want the blend to look. Once I felt like the blend was sufficient on the front I did the same technique to the sides.


Step 4:
After allowing this blend to sit and fully dry I then started working on the Decoupage Paper. Grace on Design papers come with 2 different designs in each pack however you receive 3 different sizes images. You will get:
1 sheet 24"x 36" main image
1 sheet 18"x 24" pattern image
1 sheet 12" x 18" main image
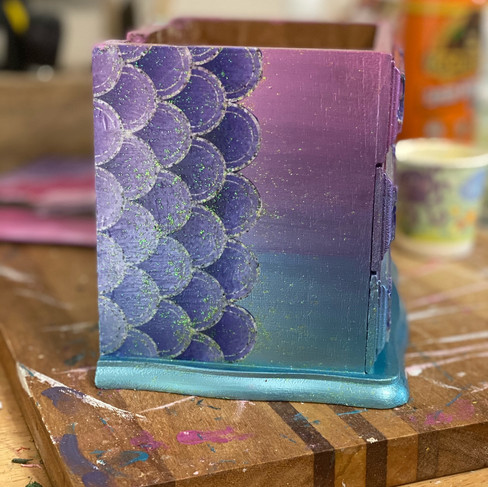
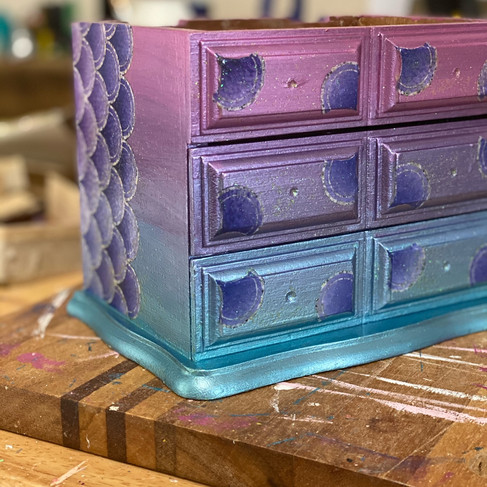
For this project I used the smallest image of the Siren Song and the companion pattern image of the scales of her fin. The mermaid herself was too big so I decided to cut her out of the design and off where her fin started and used the companion piece to accent with her scales instead.
You can apply decoupage papers a number of ways. I enjoy the spray adhesive technique however for this project and since I was working with really small pieces I used the wet method. This method applies the decoupage papers using clear coats as an applicator. Once I had the individual scales cut for the front of the drawers, sides, top and the mermaid for the top I started applying. I used Miss Lillian's Luster in Satin. I did a quick thin layer and then laid the paper just where I needed it. One nice thing about Grace on Design papers is they are easily movable if you happen to place them in the wrong spot.

Step 5:

Once you have all your papers applied as your want you can clear coat right over the papers. It doesn't effect them in any way. Since we all know mermaids love glitter and shiny things and their fins are gorgeous I added the Sparkle from Miss Lillian's to their Luster clear coat. You can add more or less depending on how much you want. The glitter does tend to sink to the bottom so it's best to give it a good mix before applying and keep mixing as you go. This gave such a gorgeous shimmer on top of the decoupage paper and I applied this all over the box.


Step 6:
At this point I am ready to complete the interior lining. I use the previous lining as a guide and cut out new pieces from my Benecreate Velvet Adhesive. Once the interior is all done I cleaned up the hinges and knobs and sprayed the new metal feet in gold. She's all done!


Comments